Pages

Thursday, June 30, 2011

Flowers with Faces


Welcome to another day of "cute" projects featuring Peachy Keen Stamps.  I decided to try the stamps on some flowers and I just love the way they turned out.  I used the flowers for a card that you can see over on the  Peachy Keen Stamps blog.


I used the "peachified" flowers to decorate some candy for a little favor bag.  These are "Nuggets" candies and they are fun to wrap and decorate for tiny gifts.  The decorative paper is cut in strips that are 1 x 3 inches and then simply wrapped around the candy and adhered on the back.


The smiling face is from the Everyday Character Face Assortment (PK-490).  I arranged the nuggets as they would be placed in the bag and then added the flowers.  Each face has a tiny pink pearl nose (from Creative Charms).


I cut a piece of pink cardstock at 2 1/2 x 3 inches to make a backer for the bag.  (The bags I use are 3 x 4 inches - you would adjust to suit the size if you use a different bag).  This helps to keep the candy in place and adds another punch of color.


To create the bag topper,  I cut a piece of the same paper used to wrap the candy at 3 x 3 inches and folded it in half.  I used a Martha Stewart border punch to create a decorative edge on the front.


A large binder clip will hold everything together while you punch two holes and thread some ribbon through from front to back.


The ribbons should cross in the back and then come to the front through the opposite holes.  I use about a 6 inch length of ribbon and then trim the ends.  If you have a lot of treats to make up this will conserve the ribbon - bows take a lot more ribbon to finish!


You could add a message on the back of the pink cardstock - or stamp more faces!


Remember, you can leave comments on my posts here and the coordinating posts on the Peachy Keen blog all week for a chance to win the PK-590 Blushing Bride Interchangeable Faces set.

A special note for my overseas friends and readers - Most of you know that I am also on the Design Team for Scrappy-Go-Lucky which is based in Australia. Scrappy-Go-Lucky works with Peachy Keen and sells Peachy Keen stamps to the Australian and UK markets.

In honor of my Guest Designer week, Mandy has set up a special code of PKDI which will take 10% off your order of Peachy Keen Stamps. This code is good only for Australia and the UK and will expire Sunday, July 3rd at midnight (Boston time). For those of you in Australia or the UK, this would be a perfect time to add to or start a collection of these great stamps!


Tomorrow will be my last Peachy Keen Guest Designer day.  I wonder which project I should share...

Subscribe to Capadia Designs 


  Share/Bookmark

Wednesday, June 29, 2011

Lots of Tiny Peachy Keen Faces!


It's my third day as Guest Designer on the Peachy Keen Stamps blog and today I have something a little different to share with you.  If you are new to my blog, welcome and thanks for stopping by!


I stamped faces on these clothespins with StazOn ink to make little dolls for my neighbors (won't they be fun to dress up!).  While I was cleaning the tiny stamps an idea popped into my head.


I figured out a way to make my own "Peachy Paper" by stamping rows of tiny faces in a grid fashion.  The stamped piece above was my first attempt.  I didn't think about filling in the gap at the right until it was too late.  You can see more photos of the process in my post on the Peachy Keen Stamps blog HERE.


After I had filled the cardstock with images, I cut the word "Smile" from the Cricut Gypsy Wanderings cartridge.  I wanted to highlight one of the smiling faces in the background so I decided to make a ring to put around the face.


I could have set up a cut on the Gypsy or with Design Studio but I chose to use this "low tech" punch method.  If you have a set of graduated size punches it is a handy trick to know.  Just punch the first circle with the smaller punch.  Then, move the punched circle to the second punch area and center it in the opening.  When you punch the larger circle, you will have a perfectly shaped ring to use to highlight something on a card or layout.


Once the ring was placed, I couldn't resist adding a bit of bling to make the smiling face sparkle.  I also added a gem to the flower in the "Smile" and tied a piece of gingham ribbon around the top of the card.


I hope this card will bring a smile to someone's face when they open it.


Remember, you can leave comments on my posts here and the coordinating posts on the Peachy Keen blog all week for a chance to win the PK-590 Blushing Bride Interchangeable Faces set.  If you have questions about how to use the stamps, there is a very helpful "How To" section on the Peachy Keen site HERE.


This is the second card I made with "Peachy Paper" - just in time for the Fourth of July!  You can see more about this card on the Peachy Keen Blog HERE.

A special note for my overseas friends and readers - Most of you know that I am also on the Design Team for Scrappy-Go-Lucky which is based in Australia.  Scrappy-Go-Lucky works with Peachy Keen and sells Peachy Keen stamps to the Australian and UK markets.

In honor of my Guest Designer week, Mandy has set up a special code of PKDI which will take 10% off your order of Peachy Keen Stamps.  This code is good only for Australia and the UK and will expire Sunday, July 3rd at midnight (Boston time).  For those of you in Australia or the UK, this would be a perfect time to add to or start a collection of these great stamps!

I'll be back with another Peachy Project tomorrow - have a great day!

By the way - the "Look Books" for the latest Hello Thursday Cricut  cartridge release (the Event and Project cartridges) are now available on the Cricut.com site HERE.  The Cartridge Library has not been updated and when I last checked there was not an update for Design Studio available yet - soon, I hope...

 Subscribe to Capadia Designs 

  Share/Bookmark

Peachy Face Backgrounds


This post originally appeared on the Peachy Keen Stamps blog when I posted as a guest designer on June 29, 2011.

Wow - it's already Wednesday!  I am having a great time creating with the Peachy Keen stamps and I hope you are enjoying the projects I have been making.  Thanks for all of the comments here and on my blog, Capadia Designs.
 
I was thinking about some new ways to use the face stamps.  I have seen many cute paper dolls and critters featuring the faces, however, I wanted to try something a bit different.  When I looked at the tiniest faces in the Everyday Character Face Assortment (PK-490) I had a few ideas...


I recently found some colorful clothespins in the dollar bins at Staples.  I thought it would be fun to make some clothespin dolls for my little neighbors and I found that the 3/8 inch faces were a perfect fit.


These will be fun to dress up with paper cuts or fabric.  I used StazOn ink to be sure that the faces would be permanent. I cleaned the stamps right away and while I was cleaning them an idea popped into my head!


I took the six small face stamps and lined them up on the grid of my cutting mat.


I used my rectangular acrylic block to pick up the faces.  It is important to use a grid or some system to keep everything aligned properly.


I stamped rows of faces on a piece of cardstock cut at 4 x 6 inches.  I used the grid to help keep the spacing accurate and then shifted the stamps to the right or the left to fill in the pattern.


When I was finished, I had created "Peachy Paper!"  I used this as the background for my 5 x 7 inch Fourth of July card.  The blue layer is cut at 4 1/2 x 6 1/2 inches and the white layer is just a bit larger to give a pin line frame for the red, white and blue theme.


I stamped the sentiment with a Studio G stamp (the sets that are in the dollar bin at the large craft stores).  After working with the Peachy Keen stamps I noticed a big difference in the quality of the stamps.  The Peachy Keen stamps ink so well and leave such a clean impression.  It is better to save up and get this peachy quality than to have a binder full of unused "cheap" stamps!


I used this adorable cut from the "A Child's Year" Cricut cartridge - one of my all-time favorites.  The crowd of Peachy faces is watching the parade pass by!


The Fourth of July card was my second "Peachy Paper" card.  This "Smile" card is the first one I made and you can read more about it on my blog, Capadia Designs.


Remember, you can leave comments on my posts here and the coordinating posts on my blog all week for a chance to win the PK-590 Blushing Bride Interchangeable Faces set.

I have lots of ideas for variations on this technique - I hope I may have inspired you to try it too!

See you tomorrow!

Subscribe to Capadia Designs if you would like to have new posts delivered directly to your email.

Tuesday, June 28, 2011

Peachy Keen Stamps Sketch Challenge (take two)


Hello again - it's time now for the Tuesday Challenge for Peachy Keen Stamps.  Thanks so much for all of your kind words and comments here and on the Peachy Keen blog.  If you saw my post earlier this morning on the email feed you saw a sneak peak at my card that is now posted for the challenge.


Here is the full card from this morning's sneak peek.  The Tuesday Challenge is Sketch Challenge 55.  For all of the details, please click over to the Peachy Keen Challenge Blog HERE.

Here is the challenge sketch


I don't usually work from sketches but I enjoyed making the card for the challenge.  I actually made a second card which I'll share here.  For all of the details on the challenge card with the Santa, please see my post on the Peachy Keen Blog HERE.

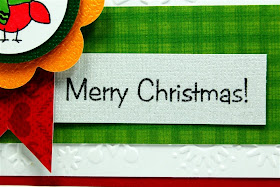
For my second card, I made a smaller A2 size card.


I chose this set, PK-322 Christmas Tag Minis as the set to feature because it had so many great icons for small projects as well as sentiments as well as "to" and "from" for making tags.


This adorable little bird is the featured image for my second card.  I used the Creative Memories Scalloped Circle and regular Circle punch in two sizes for the green mat and the bird image.  This little fellow was easy to color with my ProMarkers.


I used foam squares to add dimension under the green layer and the scalloped circle which was punched from pearlized gold American Crafts cardstock.  The white background layer is embossed with the Snowflake Cuttlebug folder.


I stamped the sentiment on a scrap of Core'dinations white gemstone cardstock.  It stamped neatly on the textured surface.  The red and green printed cardstocks are from a DCWV Christmas stack.


Here are some of the other images from this set.  The peachy color of the stamps is so appealing - it just makes them fun to use!  I have found that these stamps take ink incredibly easily and stamp perfectly the very first time.  The images on the stamps are very firm and you do not have to apply a lot of pressure to get a good stamped image.


Here is one little tip about cutting the tail of the vertical piece in the sketch.  For the Santa card, I used ribbon and you can simply fold it in half and cut the tail.  I didn't want to fold the cardstock so I lined it up with the grid on my mat and drew a pencil dot in the center at one half inch from the bottom.  Then I simply snipped from each corner to the pencil dot.


Thanks for stopping by today and don't forget to leave a comment here and on the Peachy Keen Blog to have a chance to win this great "Blushing Bride Interchangeable Faces" set (PK-590). 


A special note for my overseas friends and readers - 
Most of you know that I am also on the Design Team for Scrappy-Go-Lucky which is based in Australia.  Scrappy-Go-Lucky works with Peachy Keen and sells Peachy Keen stamps to the Australian and UK markets.

In honor of my Guest Designer week, Mandy has set up a special code of PKDI which will take 10% off your order of Peachy Keen Stamps.  This code is good only for Australia and the UK and will expire Sunday, July 3rd at midnight (Boston time).  For those of you in Australia or the UK, this would be a perfect time to add to or start a collection of these great stamps!

I hope you have a great day!  I'll be back tomorrow with some more "peachy" projects!

Subscribe to Capadia Designs 

  Share/Bookmark

More Peachy Keen fun! ( a little later today)


Good morning to everyone on the email subscription.  I just want to let you know that today is the Tuesday Challenge for Peachy Keen Stamps and my post as Guest Designer won't go live until 11 a.m. Eastern time.  A lot of people tell me that they count on the morning emails every day, so I didn't want you to think there was nothing new coming today.

Isn't this Santa darling?  You will find out more about him and my challenge card later this morning.  I also have a second card based on the challenge to share here.


Most of you know that I am also on the Design Team for Scrappy-Go-Lucky which is based in Australia.  Scrappy-Go-Lucky works with Peachy Keen and sells Peachy Keen stamps to the Australian and UK markets. 

In honor of my Guest Designer week, Mandy has set up a special code of PKDI which will take 10% off your order of Peachy Keen Stamps.  This code is good only for Australia and the UK and will expire Sunday, July 3rd at midnight (Boston time).  For those of you in Australia or the UK, this would be a perfect time to add to or start a collection of these great stamps!

If you are reading this early in the morning, don't forget to check back to see today's challenge projects and to leave comments for your chance to win a great set of Peachy Keen Stamps.

More to come...

Subscribe to Capadia Designs 

  Share/Bookmark

Monday, June 27, 2011

Peachy Keen Stamps Guest Designer Week


Happy Monday!  This week I will be a Guest Designer for Peachy Keen Stamps.  Many of you may already be familiar with these great  stamps - if you are not, you are in for a treat this week.  These are definitely a great addition to any craft room.  The stamps are made in the USA and have a lovely "peachy" color.  They are of very high quality with sharp clear images.

The generous folks at Peachy Keen have provided a stamp set for me to give away to one lucky person.  The details about the stamp set and how you can try to win it are at the end of this post.

My first set of Peachy Keen stamps was a gift from a friend.  It was the Dolly Dumplins Face assortment set and I used it to make some paper dolls.  For a long time, I thought that Peachy Keen only made face stamps but eventually I discovered that they have much more to offer.


I used this sweet star stamp (PK-M20) for the card I am sharing today.  I wanted to make a congratulations card that would be suitable for any age.  I combined the cute stamp with a color scheme that is a bit unconventional for a "cute" card.  Maroon and gold are our local school colors so I could use this card for a young friend or a teacher.


Instead of coloring the stamped image with markers, I decided to heat emboss it with a gold metallic embossing powder.  I stamped the image with Versamark ink on a pearlized textured cardstock from American Crafts.  The Peachy Keen stamps are crisp and sharp and the tiny letters stay quite legible when they are embossed.


The transformation when the powder is heated always seems magical to me!  I cut out the image with a circle Nestabilities die and cut a larger pinking circle from dark gold pearlized cardstock with another Nestabilites set for the bottom layer.


I decided to add a bit of a twinkle to the eyes with some small gem stickers.


The card base is cut from maroon cardstock at 8 1/2 x 5 1/2 inches and folded for an A2 card.  The first layer is the same dark gold pearlized cardstock cut at 5 3/8 x 4 1/8 inches and the black layer with the star pattern is cut at 5 1/8 x 3 7/8 inches.  The "Congrats" sentiment was cut with the "Everyday Greetings" Cuttlebug combo set.

I'll be sharing a variety of projects with you during this week.  For one of them, I'll be using this set of more "adult" faces called "Blushing Bride." 


This set can be used to create lots of different looks by using eyes from one stamp with the nose and mouth from another stamp.


This example from the Peachy Keen website shows the variations that are possible.

So, how do you get a chance (or ten chances) to win this set?  It's easy.  Just leave a comment on each post I make here on my blog and on the corresponding post on the Peachy Keen blog, every day this week.  If you comment on both blogs on all of the days you will have ten chances to win!  The winner will be drawn and announced on Saturday, July 2nd.  You do not have to follow or subscribe to my blog to be eligible to win but I'd be happy to have you follow or subscribe if you'd like to keep up with my projects regularly!

I am looking forward to a great week.  Tomorrow I'll be participating in the Tuesday Challenge with a project based on a sketch.  Do you have any Peachy Keen Stamps?  Which are your favorites?

Subscribe to Capadia Designs

Share/Bookmark