Pages

Saturday, April 30, 2011

Discussion Day #3 - A Perfect Day (and some more blog hopping)


I thoroughly enjoyed the Royal Wedding - everything about it was nearly perfect.  Did you see some of the amazing hats?  We lived in England for five years and the women really do wear hats for special occasions.  I loved looking at them in the millinery departments of the large stores.  Unfortunately, I have thick hair and a relatively large head so it was difficult to find hats that actually fit. 


In 1998, my husband and I had the chance to attend the races at Ascot.  It was not the "Royal Ascot" week that you think of in the play My Fair Lady, however, the Queen, Prince Philip and other members of the Royal Family were in attendance.  I did find a hat that fit for the occasion!

The Creative Charms Farewell Blog hop is continuing through the weekend.  I want to welcome any of you who are here for the first time because you are "hopping" through.  For my project and the full information on the hop, please go back to Friday's post HERE.  If you visit all of the blogs and put the message together you could win the Grand Prize.

I am also participating in a two day Disney Pixar Blog Hop which begins today.  I don't do many blog hops so it is funny that these both ended up on the same weekend.  I am part of the Sunday group so you'll have to wait until tomorrow to see what I have prepared.  The hop will start on Shawn's blog HERE.  If you are on Facebook you can see the event page HERE.  The Grand Prize for this hop is a Gypsy

 I hope you find lots of inspiration in all of the blogs you can visit on these hops. 

Today is Saturday so it is time for our next "discussion."  I have really enjoyed reading the comments and I hope you have had a chance to check in and see what other have to say.  Last week's discussion about "how much is enough?" was very interesting and made me rethink a few things

A few people wrote that they had typed a long comment and then lost the post when they hit reply.  I don't know if there is a limit to the length of the posts in comments on Blogger or if there was another reason this was a problem.  If you have a lot to say, you might want to type your comment as an email draft and then paste it into the comment form.  If there is a problem you could go ahead and email it to me (capadiadesigns@gmail.com) to add to the body of the post.

 Discussion Day #3 -  Time to Craft

Most of us have many demands on our time.  While we may want to spend time crafting, there are always the daily details of life that require our attention.  The internet is a great resource for information and shopping for supplies, however, it can be a huge time sink. If you are constantly reading about projects that others have done and searching out tutorials for various techniques (or hanging out on message boards or Facebook) you might not get a chance to actually make something during whatever amount of time you have for crafting.

If you had the luxury of a full weekend with no other responsibilities (no job, kids, spouse, cooking, cleaning, laundry, paperwork or other distractions) what would you do?  Are there things you want to try that you haven't had time to investigate?  Are you a chronological scrapbooker who needs to "catch up"?  Do you have a project that doesn't need to be done right away that you'd love to complete ahead of the deadline for once?

Are there tools in your home that you have purchased but have not mastered (or even used!)?  Is there a technique that interests you that seems too complicated, messy or time-consuming to try in your normal schedule?  Would you want to spend some of the time attending a class or crafting with others or would you prefer to be on your own with the luxury of doing whatever you wanted to do?

I'll confess that I have a Wacom Bamboo Craft tablet that I was so excited to purchase with the idea of using it for my digital crafting.  I have only taken it out once and I'd love to spend the day getting to know all that I could do with it.

If there is a specific tool or technique that you have questions about be sure to mention it and perhaps another reader will chime in with some helpful tips for you.  I will also do my best to answer any questions you have if I am familiar with the tool or technique.   I'll continue to leave a link to the topic at the bottom of each post for the week so you can add your thoughts at your convenience.

Have a wonderful weekend and happy hopping! 

(The tulip at the top of this post is blooming in our front yard - I'll have some more to show you with that image in a couple of days...)

Subscribe to Capadia Designs

Share/Bookmark

Friday, April 29, 2011

Creative Charms Farewell Blog Hop


Happy Friday - Royal Wedding Day - and welcome to the Creative Charms Farewell Blog Hop.  Our Design Team is transitioning to a new term and we are saying goodbye to some very talented designers and welcoming some new additions.  You should be arriving here from Laura's blog.


If you didn't come from Laura's blog and you want to play along with the blog hop, please go to the Creative Charms blog HERE so you can collect the word clues in order.  If you visit all of the blogs, collect the words to form a message and then send the complete message to Midori via email
(midori@creativecharms.com) you will be entered to win the Grand Prize.


Creative Charms has so many great products to work with - it is hard to choose a favorite.  I find myself reaching for the Gradient Gem Stickers and the Pure Blossoms to give just the right finishing touch to many projects.

Since it is the day of the Royal Wedding, I decided to make a simple wedding congratulations card.  I used two shades of Core'dinations gemstone cardstock (opal and pearl).  This cardstock has a lovely sheen and is very elegant for a special occasion card.


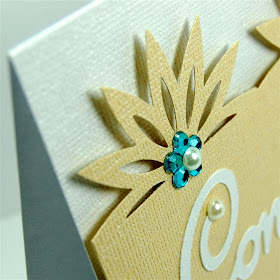
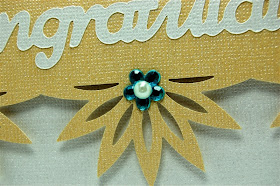
For the card base I cut a piece of the pearl gemstone cardstock to 10 x 7 inches, then scored and folded it in half to form a 5 x 7 inch card.  Next, I punched both sides of a 4 1/2 x 7 inch piece of the opal cardstock with this Martha Stewart "Aster" Deep Edge Punch.  The sizing works out perfectly for a seven inch strip.


The "Congratulations" sentiment is from the Martha Stewart Crafts Elegant Cake Art cartridge.  


I chose this sentiment because it had a short descender on the "g" and I could cut it in a larger size to fit nicely on the punched strip.


The punched strip is raised with foam squares to add dimension and a nice shadow line around the shapes.


Adding a pearl to the center of each pure blossom gives a more finished look.


Two more pearls accent the "C" and dot the "i."  You could change the color of the pure blossoms to suit the wedding colors.

If you'd like to see more Creative Charms projects on my blog they are labeled "PR - Creative Charms."  All through the hop you will see lots of ways to use these lovely embellishments.

In case you get lost or confused along the way here is the list of blogs in order.

·         Creative Charms – www.creative-charms.blogspot.com
·         Kristal – www.kandrewdesigns.blogspot.com
·         Amber – www.thecountryscrapper.blogspot.com
·         Sandra – www.scrappinmomof1.blogspot.com
·         Jan – www.papercraftpeasures.blogspot.com
·         Laura – www.lauraachilles1.wordpress.com
·         YOU ARE HERE  Diane www.capadiadesigns.blogspot.com 
·         Jennifer H – www.jenniferhansenscrapgallery.blogspot.com
·         Michelle – www.chengunation.blogspot.com
·         Lisa – www.lisadorsey.blogspot.com
·         Chris – www.workforscraps.blogspot.com
·         Jamie – www.jamielanedesigns.blogspot.com
·         Amy – www.aimitup.blogspot.com
·         Jennifer Y – www.thepinkroom.typepad.com
·         Trudy – www.truesgiftsfromtheheart.blogspot.com
·         Ellen – www.scrapstampnmama.blogspot.com
·         Joscie – www.cutchens.com
·         Ilene – www.whatabunchofscrap.blogspot.com
·         Midori – www.scrapsforme.blogspot.com

Goodbye and all the best to the designers who are finishing their terms.  The new team is listed in the right side bar.  I am looking forward to working with all of them.

The word you need to collect from my blog is "TO."  

Once you have the complete message you can send it to Midori (midori@creativecharms.com) for a chance to win the Grand Prize - one each of the Kit and Deal for MayThe deadline to send the answer is midnight Sunday May 1st (EST).  The Grand Prize Winner will be announced on Monday, May 2nd on the Creative Charms Blog.


I will also choose one comment from this post by random draw and send that person a package of Gradient Pearl Stickers in white - perfect for a wedding project!  I'll post the name of the winner on Monday.

Your next stop is Jennifer's blog (click to go directly to her blog)

Have fun hopping - and I hope you enjoyed the Royal Wedding if you watched it this morning!

link to Discussion Day 2 - How much is enough?


Subscribe to Capadia Designs      


Share/Bookmark

Blog Hop Today (but while you are waiting...)

  
Today is the Creative Charms Farewell Blog Hop.  There is also a wedding today...maybe you have heard about it?  I'll be up watching with all of the billions around the world.

The blog hop begins at 9 am and I don't want to confuse things by posting too early.  Since a lot of you do get the morning email I thought I'd post a few photos of a place near my sister's house in New Jersey. 


The Van Vleck House has wonderful gardens and one of the most amazing wisteria vines that I have ever seen.


Here is one of the trunks of the vine - it wraps around a massive pillar.


 The vine continues along the second story and balcony.  


Some of the blooms have started but they are still quite small.   When we go back for Graduation in a few weeks I hope the wisteria will be in full bloom.


 This entire courtyard will be dripping with wisteria - what a beautiful place!


There were some azaleas in bloom so, of course, I snapped a few photos.


They are lovely and so delicate.


Be sure to check back in at 9 a.m. or later so you can follow the trail of the blog hop.  There is a word to collect on each blog and if you collect the entire sentence you can enter for a chance to win a great prize from Creative Charms.


link to Discussion Day 2 - How much is enough?
Subscribe to Capadia Designs 

  Share/Bookmark

Thursday, April 28, 2011

Designing Cards with the Computer


Wednesday was an exhausting day driving to New Jersey again but it was well worth the trip.  I was happy to be able to attend the award ceremony and very proud of our son for working hard and being chosen for the award.  The driving did take a big chunk out of my Wednesday and will also take up most of Thursday.  Then, in just a couple of weeks, we'll be back again for graduation!


I didn't have time to write up more details on the card design for Wednesday's card but I will answer the question that many of you had.  I always try to give you as much information as possible but it was late at night and I forgot to tell you which cartridge I used for the "Thank You" on the card.  


You can find this on the Martha Stewart All Occasion Cake Art cartridge - as shown on the keypad above.  The Martha Stewart cartridges are all great - I did a review of this one for the Scrappy-Go-Lucky site and you can find it HERE.   Remember - these cartridges are not just for cake.  They work in all of the machines and are perfect for papercrafting. 


I will not be able to do a step by step on the butterfly card for a few days - tomorrow is the Creative Charms Blog Hop, Saturday is Discussion Day and Sunday is the Disney-Pixar Blog Hop.  I don't do many blog hops but these both should be a lot of fun and very inspirational.

I did do a series of posts quite a while ago that explain the process of designing cards on the computer - using either Design Studio or a digital scrapping program.


 First was a post about planning a digital card which could be printed or used as  a template for cutting the card pieces.  You can find the post HERE.

 
The next post is about the actual card made from a design created on the computer.  You can see that post HERE.

Next was a post with another digital card design and several variations.  You can find that post HERE.


 Several people asked me for a file for this card so I decided to try to make a card as close as possible to my digital sketch using the Cricut and you can read about how I did that HERE.
 These posts are from more than a year ago so you may not have seen them if you are a relatively new blog reader - I hope they help you.

Just a few more things...

9 Free Fonts


Today (Thursday) is the last day of the Dollar Sale at Lettering Delights.  This sale comes only twice a year so it is a great time to add to your collection of graphic sets, printables, SVGs, fonts.  You can click the affiliate link above or in the left column to go to the site.  There are a couple of codes that could help you save even more.  "Royalty" should take $10 off a $25 purchase and "Sushi" should take 10% off your entire purchase.

The Design Studio update and the sample sheets and handbooks for the newest cartridges are still not available on the Cricut.com site.  I'll keep checking and let you know when I see that they are added.  I hope that the handbooks for the two exclusive digital cartridges on the E2 will also be included.  The handbook for Smiley cards (another digital download cartridge) is on the chart.  There are physical handbooks that are included with the E2 so the digital versions should be posted in due course.

I want to share this  photo from the ceremony (sorry it is blurry - the conditions were not good and no amount of editing was going to fix this!).  Instead of the typical speech that the other professors gave, the Music Department Chair had written clever Haiku verses for the award recipients.

link to Discussion Day 2 - How much is enough?


Subscribe to Capadia Designs 

  Share/Bookmark

Wednesday, April 27, 2011

Butterfly Thank You Card


I am sure some of you were starting to wonder when you'd see another paper project on my blog.  Things have been hectic with travels and family but I did find time to make a card today.  I used Design Studio to help me plan the card - by choosing and sizing the elements on the computer I can experiment without wasting paper.  

 
Here you can see the Design Studio preview of the card.  The only item on the preview that is cut with the Cricut is the sentiment.  The other shapes are simply used to represent the pieces that I will use for the card and to try various color schemes.


The color scheme for the card was determined by the patterned paper from the "Chloe's Closet" collection by Making Memories.  I found some of this paper at Tuesday morning recently.  There were six sheets each of four designs and one shaped and pierced page in the package, a total of 25 pieces for $3.99 and I was helpless to resist!  I don't use a lot of orange but the bright citrus colors appealed to me along with the great price.


Here are all of the pieces of this card.  The card base, cardstock layers, ribbon and butterfly were represented in the Design Studio preview, however, only the sentiment (and the sentiment shadow) were actually cut with the Cricut.


This is an A2 card (8 1/2 x 5 1/2 piece of cardstock folded to form a 5 1/2 x 4 1/4 inch card).  The first layer is cut at 5 1/4 inches x 4 inches.  I tried plain white but it was too stark a contrast with the shiny floral cardstock which has more of an off-white shade around the flowers (you can see the white at the top and the dotted cardstock I chose at the bottom in this photo).  I remembered the DCWV Citrus Stack which has similar bright colors and I found this off-white dotted with orange cardstock in the stack.  The two lines work together nicely.  The floral cardstock is cut at 3 3/4 x 5 inches.


The ribbon is from American Crafts.  I cut a piece to wrap around the floral patterned layer and simply added a bit more adhesive with my ATG to hold the ribbon.


This basic layering is a great start for many cards - all you have to do now is add an embellishment and a sentiment for a quick and easy card.


In my preview, I used only the top layer of the sentiment.  I didn't have the option of adding the patterned paper to preview the effect (one of the things that I really like about the new Craft Room online design tool is the ability to fill images with patterned paper - I just wish we could add papers other than the ones available on the Imagine cartridges).  By looking at the sentiment on the card front it is obvious that I needed to add the shadow layer.


You can see what a difference adding the layer makes - the sentiment is easy to read now.  I used the same DCWV paper that I used for the first layer for the shadow.


I added a butterfly instead of a bow on the ribbon.  This butterfly is from the Creative Charms Kit of the Month for April (available for just a few more days).  I used a large dimensional glue dot to hold the bulky butterfly securely.


Here is a closer view of the butterfly - the colors work together perfectly.


The dots in the first layer and the sentiment shadow also coordinate with the dots in the floral patterned paper.  This cardstock is shiny but not glittered.  The card base and the top layer of the sentiment are Bazzill cardstock which also coordinates well with the blue color in the design.


I would probably send this card to a crafty friend and hope that the butterfly would be plucked off and reused for another crafty project!

I have explained about the use of color previews before - here is a LINK to a post from last fall.  I'll try to post another explanation of exactly how to plan a card in Design Studio tomorrow.  I have been doing this for years to save paper and help myself make color choices.  This is something you can do with just the trial version of the program if you want to have a better idea of the proper size and placement of your cuts.  I'll be driving back to New Jersey for a quick trip to attend an award ceremony at our son's college - he was chosen to receive the Annual Award for Music and we are very proud of him!  If things get too crazy it may take a day or two to add this post.

link to Discussion Day 2 - How much is enough?

Subscribe to Capadia Designs

Share/Bookmark