Pages

Monday, February 28, 2011

Creative Memories Sale - last chance


Today is the last day to order the February sale items from Creative Memories - here is a LINK to the page on my site with the sale items.   Several of you have ordered the Memory Manager software and I will be doing an online session in March to help you with any questions. 

Starting tomorrow (March 1) you should be able to order the new exclusive Cricut cartridge, Stork's Delivery.  Here is a LINK to the page for the Cricut cartridges - I'll update this at sea if I can.

Today we will arrive at Grand Turk in the Turks and Caicos - we're planning to take a tour of the area.

Subscribe to Capadia Designs

 Share/Bookmark

Sunday, February 27, 2011

At Sea


A week or so ago I came across a blog called eighteen25 - you can find it HERE.  It is written by three sisters who grew up in a house numbered (you guessed it!) 1825.  They still live within a few miles of each other and have 11 kids between them - that sounds like fun!  You can find all sorts of interesting projects, recipes and tips on their blog.  They also share ideas that they find on other blogs with links.

There are often free downloads shared on the blog. Some great subway art for St. Patrick's Day is available HERE.  If you look back through the blog you will see similar art for other holidays (Valentine's Day, Christmas). 

One of my favorite ideas that they shared for Easter is HERE.  I hope you enjoy exploring this blog - I think maybe I liked it because I also have two sisters - unfortunately we live in three different states...

Today we will be "at sea" - relaxing and taking a few Cricut Imagine project classes.

Subscribe to Capadia Designs 

  Share/Bookmark

Saturday, February 26, 2011

Creative Charms Weekend Giveaway


Happy Saturday and greetings from sunny Florida!  
I wanted to let you know about the weekend giveaway at Creative Charms.  You don't have to be a Facebook user for this one.  This week you can win one a fabulous February Kit of the Month.  All you have to do is follow the Creative Charms Blog (just click the name to go to the blog)  and leave a comment. While you are there, be sure to take a look around at all of the great projects the Design Team has posted.  You have until Sunday, February 27th. The winner will be announced on Monday, the 28th.

We left Massachusetts in a rainstorm and had a slightly bumpy flight but made it to the hotel and have started to meet up with others on the cruise.  So far we've seen Joy and her husband, Melanie and her Mom, Okie and her daughter and her friend Karen, Robyn and Karlee.  Thanks to everyone for all of the good wishes - this is going to be fun!
Subscribe to Capadia Designs 

  Share/Bookmark

Friday, February 25, 2011

Leaving on a Jet Plane...


Today we'll be flying to Florida - it looks like the weather will be fine for flying - it isn't snowing so with a little luck there will be no delays.  I should have a little time in the afternoon at the hotel to tidy up things on the blog for the time that I will be "at sea" on the Cricut Cruise.

I want to thank all of you who have purchased a Creative Memories Reminisce Accents or Cheerful Seasons Cricut cartridge through me.  I had enough sales in October to qualify for the layout contest.  Thanks to many of you who voted for my layout (and lots of others who don't even read my blog) I am taking my husband on a special trip for our 30th anniversary - with a lot of Cricut activities scheduled too - it should be great!

I will try to have posts scheduled and I may even find that internet is not prohibitively expensive and check in once or twice from the ship if possible.  You know that there will be lots of photos (and stories - after all my "evil twin Okie" will be there!) once I get back home.

The image at the top of this post is from one of the 20 innovative new products featured at CHA.  This is a photo transfer paper that works with an inkjet printer and transfers images beautifully to many surfaces including glass and wood.  The product is by Lesley Riley and is called Transfer Artist Paper, here is a LINK for more information. 

It is amazing what you can make by combining old photographs with paints and canvas.  I am wondering if I could find a "swimming costume" like the one in the photo after some struggles trying on bathing suits for this trip!

Have a great weekend!

Subscribe to Capadia Designs 

  Share/Bookmark

Thursday, February 24, 2011

The Simplest of Cards


I added another Martha Stewart "Punch All Over the Page" punch to my collection recently.  If you missed my first review of these punches, you can find it HERE.


 These cards were made with the "studded heart" set that I reviewed last October.  As I mentioned in that review - if you have a Cricut, you can make cuts anywhere on your project so this type of punch is not really needed (unless you also like to collect punches).  I did find this particular design useful because it has such tiny holes around the heart and those would be very difficult to cut with the Cricut.


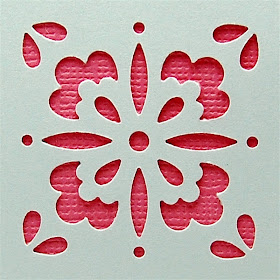
The set I recently purchased is called "floral tile" and I chose it because it also had some tiny circle cuts.  I also thought it would be fun to try making some lace cardstock with this punch.  I am working on a system to make punching even patterns with these punches simpler and more accurate.


The punch works with magnets and the notched corner, along with the polarity of the magnets, makes it easy for you to line it up correctly.


I centered the punch on a plain white cardstock A2 card (the photo is grayed to help you see the design better).  It is so simple and pretty with just the one punch.  Of course you can add more punches in a planned design for a fancier card.


You could make a set of cards with different colors of cardstock centered on the inside of the card to add just a tiny splash of color. 


I think the stripe of color is a bit more interesting than a full liner would be. 


You could easily make up a lot of these cards and then just add a stamped sentiment to suit the occasions when you need a quick card.  Sometimes simple is the way to go!

We are watching the weather carefully and hoping that there will not be any snow to delay our flight - fingers crossed!

Subscribe to Capadia Designs 

  Share/Bookmark

Wednesday, February 23, 2011

A Tip about the "Tipsy"


Do you know what a "Tipsy" is?  I had heard about this handy little tool but hadn't seen one in person.  A week or so ago I saw an offer on Facebook for a free Tipsy - you just needed to "like" the Tipsy page and pay $2.99 shipping and handling.  So I thought I'd give it a try.  Mine arrived very promptly and I really like it a lot so I want to share this information with those of you who use the Gypsy or the Imagine (or other devices that require a stylus).  You do need to be a Facebook user to take advantage of the free offer but the regular price is only $7 (plus shipping).  (edited to add - The shipping and handling fee has changed and it is now $3.99 for the free Tipsy - still a great deal!).

When I am working with the Gypsy my hand gets tired much faster than when I work on the computer.  I think this is due to the position my hand has to be in to hold the short stylus.  I had tried using a longer tool (my Creative Memories Multi-Purpose Tool) and this is easier to grip but I still found it uncomfortable to work for long periods of time.

The "Tipsy" is a flexible stylus that wraps around your finger so you just use your hand - it basically turns your finger into the stylus.  Since it is wrapped around your finger you don't have to constantly pick it up and put it down.

I do not have any association with this product or the company other than seeing the notice and sending my $2.99 for the free Tipsy.  I think I will be buying a few more of these so I can keep one with the Imagine, one with the Gypsy and one for a spare.

If you want to find out more about this handy helper here is a LINK to the page with the information on how to get one if you are on Facebook.  If you are not a Facebook user, this LINK will take you to the regular home page for the site.  I think you will like it if you try it!


In just a few days we will be leaving for the Cricut Cruise.  I am getting closer to finishing my packing - I always leave things to the last minute when getting ready for trips so I am trying to prevent that from happening this time!  I am also getting posts set up for while I am away so if you are an email subscriber or a follower you will still get your daily update even though I will be offline for a week - the first real vacation I have had for quite a while!

Subscribe to Capadia Designs

Share/Bookmark

Tuesday, February 22, 2011

Chandeliers and other things...


Just a quick post for today - I have too many things that I am juggling and need to finish before I leave. I was looking for some photos from CHA to send off to Mandy in Australia and I came across a few of the photos that I took on my trip to California that were not from the trade show.


A few blocks away on the street where we stayed in Hollywood there was a very eye-catching shop.  It was a good landmark for telling the taxi drivers that we were nearly at our place.  This shop was full of gigantic chandeliers, furniture and mirrors.  I particularly liked the sign that said "Set Decorators Welcome" - a sign that we were in "movieland."


The chandeliers were some of the largest I have ever seen.


They were "dripping" with crystals and very sparkly - a different sort of bling...


Unfortunately, I didn't get a chance to visit the shop during the hours it was open - so these photos were taken through the windows.


I liked all of the different colors - particularly the pale blue.


There were even a few red and green chandeliers - great for Christmas!


I thought this mirror was very "romantic" - I may try to turn this into a digital element or make a frame from it.


A little further down the street was the "Astro Burger" - we ate there one night and our food was delicious with American hamburgers and some Greek specialities as well.


Just beyond the burger shop was Paramount Pictures - one of the big movie studios.  We thought about doing a tour but the times never worked out for us.


I really liked the ornamental gates - these look a lot like the designs on the "Ornamental Iron" cartridge.


This ironwork in the arch was just beautiful and I have a few ideas for projects inspired by this design.


Down the street in the opposite direction was a "Yum Yum Donuts" shop.  We didn't get to indulge in these tasty treats but I loved the sign!

There was more snow today...fortunately, it melted off fairly quickly.  I am really ready for the Winter to be over!

Subscribe to Capadia Designs 

  Share/Bookmark

Monday, February 21, 2011

Another Friend Card


I really enjoy using the Martha Stewart Crafts Cake Art cartridges.  There are so many beautiful designs to work with.  I am such a fan of the Martha Stewart border punches and these cartridges have many of the same borders that I have in punch form.  The great thing about using the cartridges is that you can adjust the sizes for a perfect fit on your card or page.  You can also use the borders to create new shapes with decorative edges - similar to the "Punch around the Page" sets.  By using Design Studio or the Gypsy you can make the design in any size you want.


For this card, I chose one of the short border segments, then copied, rotated and welded it to form a decorative square medallion for a card.


I also chose a flower shape with the matching shadow to layer on top of the medallion.  I set up a mat to have all three pieces cut at the same time.


My original choice for the card base was this soft green cardstock but it didn't look quite right to me, so I changed to a medium blue instead.


 I decided to do the layers a bit differently.  Instead of centering a mat on the card front I aligned it at the bottom of the card and trimmed the sides a bit.  The resulting piece is about 5 1/8 x 3 3/8 - the top part is completely covered by the medallion.


The sentiment is a stamp from a set by My Sentiments Exactly stamped in "Close to Cocoa" ink from Stampin' Up.


I adhered the flower to the shadow and made a "starter hole" for the large gem brad in the center.


The large gem brad fits almost perfectly in the center of the flower cut.


I raised the flower above the medallion with some foam squares.


I added some gems to the edges but I thought the card needed a bit more bling.


I added some pink pearls around the edges of the flower...


...then I added more white pearls near the center to finish off the card and make the flower really stand out.


The gems and pearls are all from Creative Charms.  The card base is Bazzill, the patterned papers are K & Company and the medallion mat and the flower are Core'dinations gemstone cardstock.  This card would be a good one to send to a friend who also is a crafter (and one who loves bling!).

I have written about the Martha Stewart Crafts Elegant Cake cartridge for the Scrappy-Go-Lucky blog.  There are some helpful tips for using the images to the best effect.  You can see that post HERE.  If you would like to use my Design Studio file for the medallion and flower you can also download the file from that post. 

Thanks for all of the cruising tips - just a few more days until we are on our way!


Subscribe to Capadia Designs

Share/Bookmark

Sunday, February 20, 2011

Friendship Card (for sewing friends)


This is a card with no Cricut involved - pretty rare for me!  I was trying, again, to tidy up my craft space and I came across a set of stamps from My Sentiments Exactly called "friendship sentiments."  I hadn't used this yet so, instead of finishing the cleaning (boring...!) I decided to try out one of the sentiments and make a card.


The blue card base is Bazzill cardstock and the patterned paper is Cosmo Cricket "Material Girl".  I chose the paper to go with the stamp because it had stitching and embroidery.  I didn't like the way the stamp looked on the scalloped rectangle so I went back and looked through my Nestabilities.  


I found that the sentiment fit in the Labels Three set when I turned the die on the diagonal and I liked the way this looked.  I stamped the sentiment with Broken China Distress Ink on ivory cardstock.  I had a scalloped rectangle in the same blue as the card base from my earlier attempt on the card so I placed the label with the sentiment on top of the scalloped rectangle.  I wanted to add buttons to the top and bottom.  I used a sharp pointed tool to punch the starter holes for my sewing.


I sewed the buttons through both layers and brought the ends to the front to tie in bows.  I used Lemondrop baker's twine from The Twinery - I ordered a sample pack of eight colors a while ago and this was also sitting on my table.


I left the twine a bit long when I sewed so I could adjust the bows - then I trimmed the ends.


I used foam squares to raise the sentiment from the card surface.


I think this card would be perfect for a friend who sews - the stitch patterns in the paper are charming and the homespun look seems very warm and welcoming.

I am getting very excited about the upcoming Cricut Cruise.  It was a thrill to win the Creative Memories contest for a place on the cruise last fall but it seemed so far away.  Thank you again to all of you who voted for my layout.  I am trying very hard to get ready and have my packing done before the eve of the trip.  So far - just my toes are ready!

Have you ever been on a cruise - Do you have any tips or advice?  All will be greatly appreciated.  I don't think that I will have easy access to the internet on the ship so I am planning to pre-post for the time I will be away - this way you will still get an email each day...

When I get back, I will finally have my million hits and blogoversary celebration - maybe I'll have a few tropical surprises to be added to the mix of celebration gifts!

Subscribe to Capadia Designs 

  Share/Bookmark