Pages

Tuesday, November 30, 2010

Imagine and Create (for a challenge)


This is a project that I created for the monthly challenge in the Cricut Circle.  I joined the Circle, which is Provo Craft's affinity program, when it was first announced.  There are weekly and monthly challenges, a dedicated message board, a private blog and magazine and four exclusive cartridges (one per quarter) that are included in the cost of membership. I am not sure if the membership is open right now - but there are periodic openings when new members can join.  The monthly challenges have great prizes and this month it is a Yudu machine and accessories - something I've been interested in trying ever since I saw it in action at CHA last summer.


The challenge this month was to create a home decor item.  The requirements were to use at least one Cricut cartridge cut, use the Cuttlebug in some way, use felt in some way and to use the color green somewhere on the project.


I purchased this frame a while ago - I think it was during the back to school shopping season in the college/dorm area.  I liked the translucent green color and the multiple levels.  It is meant to be used as a frame but I thought it would be a neat way to corral the supplies on my craft table while I am working on a project.


There are two 4 x 4 inch sections and two 4 x 6 inch sections.  I cut two 4 x 4 pieces in some bright polka dot glitter cardstock from a Martha Stewart stack for the 4 x 4 sections.  For the two larger 4 x 6 sections, I cut white cardstock and embossed it with the large 5 x 7 embossing folder with flowers from the Once upon a Princess Cuttlebug companion set.


The word "imagine" is from the Home Accents cartridge and I stretched it a bit vertically and welded a swirl from the Home Decor cartridge to it to fit the space nicely.  I cut it in green glitter DCWV cardstock and added a tiny pink flower with a gem sticker center - both from Creative Charms.


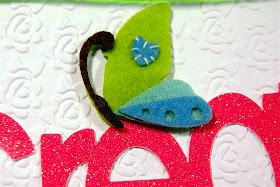
I cut the word "create" from the Home Decor cartridge in pink glitter cardstock.  I use multicut 2 times when cutting the DCWV glitter cardstock.  I added the felt butterfly in green and blue (also from Creative Charms) as an accent.


I used Design Studio to "squash the pre-welded word art to fit the 4 x 6 spot.  In this screen shot you can see the difference between the original cut and my adapted version.


As, always, I had to keep careful track of the dots for my "i"s!  These were large enough to add the adhesive to the dot and I used my handy Cricut hook tool to help me place the dots on the embossed cardstock.


When the frame is sitting flat on the table the four sections which are each at a different level are a handy spot to place tools or supplies while I am working on a project.


The frame makes a great "landing spot" and is bright and cheerful in my "lower level" (fancy talk for basement!) craft studio.

The challenge prizes are awarded by a random draw from all of the members who create and submit a project that meets the requirements.  So - one lucky person will get to start "Yudu-ing" this month.  I think it would be fun to make matching shirts for me and my "evil twin" Okie to wear on the cruise if my number is drawn!

I have some more projects to share but will do a separate post for those.  I also have a couple of new features that will be appearing on my blog next month - I think you will enjoy them and I can't wait to tell you all about the details!


Subscribe to Capadia Designs        Share/Bookmark

Monday, November 29, 2010

Still Making Snowflakes...


After a relaxing holiday weekend I have suddenly realized that there is very little time left before the full Christmas rush takes over!  The candles went in the windows a couple of days ago and today we got most of the outdoor decorations up.  I should have been doing more to get the house ready for the holidays but I got a bit sidetracked and started making more snowflakes...


I started with this frame element from Reminisce Accents.


Here is a closer view of the elaborate frame layer.  I realized that I would need to overlap the frames to add more interest.


 This is the first version of the snowflake made by adding six frames, rotating each one in increments of 60 degrees (60-120-180-240-300) and overlapping them in an attractive arrangement.  If you want more directions on how I make snowflakes you can check THIS POST from earlier this month.


I wanted to add more detail so I looked for another shape that could be used to fill the blank centers of the frames.


This is the element I chose.  I needed to adapt it slightly by using the bottom center handle to stretch it to weld nicely.


In this screen shot you can see how the image aligns with the other frames to complete the pattern.


You might be able to see the overlaps better in this screen shot - just click on the image to enlarge it.


This preview shows how the snowflake will cut when welded.  When you want to check your welds before cutting it is always best to preview on a new page so you will see only the dark cutting lines.

I haven't tried cutting this yet.  There are some places with tiny cuts so I would not try to resize the design to make it much smaller.


When this is cut there will be an "extra" snowflake that is the center of the image.


Here is one more color preview to show the design a bit more clearly.


You can make snowflakes from many images - here I used six trees!  These are from the Serenade cartridge.


Here is one more snowflake - this one uses an element from Reminisce Accents once again.  Another cartridge to try for images that might make nice snowflakes is Storybook.

I want to remind you again that there are a few special holiday offers right now from Creative Memories.


There are some special Jingle Deals available and if your order is $25 or more, you pay only $1.99 shipping.  This would be a great time to think about ordering the Reminisce Accents or Cheerful Seasons cartridges - the normal shipping for the two cartridges would be $9.35 (and the usual minimum shipping fee is $8.50 if you order just one cartridge and nothing else).

If your online order totals $225, you will receive five items worth a total of over $90.00 for FREE!  This includes a Merry and Bright paper album kit, a tape runner, Winter Cheerful Paper 12 x 12 additions, Winter Reminisce Paper 12 x 12 Additions and an Exclusive 12 x 12 Winter album - you can see these items HERE.

Photo gifts from the Digital Center are also on sale.  You can save 20 percent on Photo Panels, Mugs, Wall Prints, Mouse Pads and T-shirts. All are perfect gifts for the holiday season!

These offers are valid online only from 12:00 a.m. CT Nov. 26th, to 11:59 p.m. CT on Dec. 6th.

There is also a Facebook special from Creative Memories.  If you purchase the Nancy O'Dell Hummingbird Tote Bag (it looks like a purse and will hold an album and some supplies for a crop), you will get her new book, "Full of Love" (normally $19.95) FREE.  This offer is only good through Tuesday, November 30th, while supplies last.  There will be another special Facebook offer on December 1st, so be sure to check the Creative Memories Facebook Page to find out about that.

Both of our sons are now back from Japan and in California and New Jersey.  They had a wonderful trip and we are eager to see the photos and videos and hear all about it in a few weeks when they will be home for the holidays.  I think that there may be a few holiday gifts "imported" from Japan this year.  We still have some shopping to do but I am further ahead than usual - how are your holiday preparations going?

Subscribe to Capadia Designs        Share/Bookmark

Sunday, November 28, 2010

Candy Cane "easel" Card Display


It isn't a "traditional" Thanksgiving weekend activity, however, my husband and I have been doing some sorting and de-cluttering in various parts of our house.  In the furnace room in the basement I found some old magazines.  I only save some of the magazines we get - the ones that I "think" I will refer back to, but I seldom actually do look at them again...  There were a few Family Fun magazines and I pulled these out to give to my neighbors who had the house fire. 


Of course, I had to skim the magazines first and I saw the cutest idea in the December-January 2003 issue.  All you need to make this project is some ribbon (I used two 12 inch lengths), two twist ties and three candy canes.


Use the two twist ties to connect the three candy canes near the ends and about where they start to curve.


Then you can stand the three up and spread the canes to create a tripod.


I tied the ribbon around the twist ties to hide them.  In the top spot, I tied the bow facing to the front.


At the bottom, I tied the bow facing the back.  You might be able to tie the candy canes together by using a just a ribbon but the two step process keeps things stronger.


Here is the finished easel or stand.  You can use this for several purposes.


Here I am displaying a medallion that I printed and cut with the Imagine.


This tag was made using the Imagine More cartridge (tag background shape and paper fill) and the Snow Angel cartridge (the mitten image).  The  frame is from the Creative Charms Vintage self-adhesive metal frames.


I added a dark green strip and wrote the name in white pen for a placecard for the holiday table.


Here is another tag made from some of my Imagine Experiments.  I used Mickey Font for the letters and filled them with papers from the Snow Angel cartridge.  The gem on top of the ribbon is from the Creative Charms Vintage Jewels.


You can display the tag in the candy cane holder as well.


If you have a few special Christmas cards you'd like to display  you can make a few of these easels  very quickly and inexpensively. If you'd like to see more about this card you can see some variations and download the file at THIS POST.


This card was made using a vintage image from Twisted Papers.  They have wonderful images and you can order them as digital downloads for a very reasonable price.  You can read all about this card and how I made it at THIS POST.

Twisted Papers is having a sale right now.  Until Monday, November 29th at midnight PST, you can order anything (downloadable images, collage sheets and CDs) from Twisted Papers.com at 50% off.  (This does not include their monthly subscriptions).  Just type in the code BLACKFRIDAY when you check out.  You can also visit their Facebook page HERE.  Russell and Stan give regular freebies on this page and to email subscribers through their newsletter.  They also announced that they have a limited number of fabulous treasure boxes full of all sorts of bits and pieces for mixed media projects.  Check out their Facebook page for more details.

The holiday weekend is nearly over and our sons are on their way back to the US from Japan.  In just a few more weeks they will be home again and we are eager to have them here for a visit.  I hope you have had a lovely weekend and have been able to spend some time with family.

Subscribe to Capadia Designs         Share/Bookmark

Saturday, November 27, 2010

Pastel Christmas Stocking Card

The first few days with the Cricut Imagine I made many "trial" cuts just to figure out how to use the machine and to practice some of the more advanced functions.  This means that I have many bits and pieces on my scrap table again and they must be put to use! 
This stocking in pink and blue is from the Snow Angel cartridge. I hope you aren't tired of seeing cuts from this cartridge.  Snow Angel is probably my favorite of all of the first set of Imagine cartridges and of course it it also very timely with Christmas less than a month away.

I am a little embarrassed to admit how fast my Imagine cartridge collection is growing - I guess I just need a lot of variety in my crafting options.  I feel limited by the current set of cartridges and I would much prefer to use the digital content I have accumulated and created on my own over the past few years.  However, at least for the time being, the Imagine is a closed system so I have to add cartridges if I want some more choices for my projects.


I used the Martha Stewart Snowflake Punch Around the Page set for the white card mat.  The piece of white cardstock was cut to 3 1/4 x 5 inches.  This is one of the sizes that will work properly for the corners and edges to line up.  The dark blue mat layer is cut at 3 1/2 x 5 1/4 inches.


I had some dollar bin ribbon from Michael's that was a great match for the colors in the stocking.  I cut a piece and wrapped it around the front of the card to fill in the area beside the matted image on the A2 card.  I simply used my ATG adhesive to hold the ribbon in place.


To hide the ribbon ends on the inside, I created a liner for the card.  I cut a piece of good quality writing paper to 8 1/4 x 5 1/4 inches, scored and folded the paper in half and then punched one edge with the border punch from the snowflake Punch Around the Page set.

I added adhesive to the plain side and set the liner in the card, then folded the card over to be sure that everything lined up correctly.


I find that the cards are more attractive if the liner is only adhered to one side.  This helps to prevent misfit liners that pull and tear.  It also give you more places to write inside the card.


In this view you can see how the liner keeps the snow theme going to the inside of the card.  The pale pink card base is Papertrey Ink cardstock.


 I cut another short piece of ribbon and tied it around the long border piece.  Then I trimmed the ends.  The ribbon had a tendency to fray so I added some Stickles glitter glue to the ends to act as a fray check.


The stocking has a lovely printed design but it seemed a little flat.  I decided to give them some sparkle with the Stickles.  I was eager to take the photos and I took this while the Stickles still were wet.  They look a little lumpy here but they do dry nice and flat and give just the right amount of sparkle to the card.


You could make a card in more traditional Christmas colors by using the red and green stocking on the Snow Angel cartridge and changing the colors of the card base and mats to suit.  If you don't have the Imagine you can make a similar card by cutting a stocking from another cartridge from some lovely patterned paper.

I hope you were able to snag some great bargains if you went out for Black Friday. I managed to spend money from the comfort of home with a few bargain internet purchases and one splurge!

One other note - I finally decided to have my own .com address for the blog.  This will help with some plans that I have for next year.  Unfortunately, I must have waited too long to claim my own name - several versions are already owned by "squatters" who would charge me a small fortune to get my name back.  So, I dropped the "s" and the new address will be   http://www.capadiadesign.com/

Everything is supposed to transition automatically over a few days and if you have the old address bookmarked it should just forward along seamlessly.  A few things did get mixed up in the conversion and I lost my blog list on the side bar so I will be doing some blog housekeeping to try to tidy things up in the next week or so.

Subscribe to Capadia Designs        Share/Bookmark