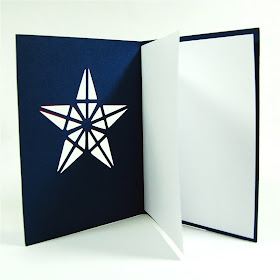
Thanks to everyone who volunteered to test the file for the card I posted yesterday. I actually took a bit of a break today and did not have a chance to send the file out - but I did retest it and it is ready to share. I left the first page in the file - that page shows the element I used and has my original design which I resized to fit an A2 card.
I don't think I explained yesterday that the star cuts on page three of the file could be layered on the card for another effect so I put together another card to demonstrate this today.
Here is the card base after you cut and score the card.
The layer is made from the same star that I used for the cut out in the card so it will fit perfectly on top of the cut out. You do have to pay attention to align the layer to the star because the design is not perfectly symmetrical. Just try various points at the top until you find the perfect fit and then put a pencil dot on the back of the top point to help you find it again once you have added adhesive.
I usually add a liner to make this type of card more practical for sending a message. I cut a piece of good quality, text weight paper at 8 1/4 x 5 1/4 and fold it in half. Then I put a strip of adhesive near the fold on the back of the card.
I place the folded paper on the front side of the card, making sure that it is centered and aligned with the fold. Then I fold the back of the card to the front and press along the fold to be sure that the liner is adhered.
This method gives you plenty of room to write, stamp or print your message and preserves the impact of the cutout image on the front of the card.
Here is another view from the top.
The contrasting star has a nice impact but could be "fancied up" a bit - with pen stitching, Stickles...
...or gems! I added these tiny diamonds at the tips of the star and a slightly larger gem at the center of the star.
You can download the .gypsy file HERE.
I wasn't online much today so I am a little behind on answering email and comments. I'll do my best to catch up tomorrow. I hope you are enjoying the long weekend.
Subscribe to Capadia Designs


Love this! Thanks for always taking the time to teach and share. :o)
ReplyDeleteNice job!
ReplyDeleteI thought the white was a mirrored
type paper at first. That would be
pretty too!
I know it took you a long time to
create this. Thank you for sharing
your talent. (hug)
Thanks for explaining projects so simply. It makes them easy to follow and re-create:) This is a great card!
ReplyDeleteWow, Diane! That is so pretty! I especially love it with the bling added and that is a great tip for a way to add the liner so it is perfectly straight every time!!! Thanks so much for sharing!
ReplyDeleteHugs!
Linda
love the touch of bling to your card! that star is awesome!
ReplyDeleteI love it even more with the blue and red combo! What a perfectly understated patriotic card. love your work. I was telling my girlfriend about your blog this morning and this card.
ReplyDelete