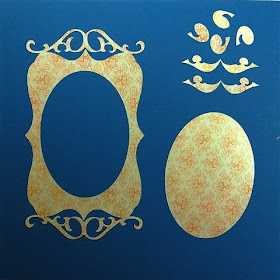
Last month, I shared a file for this fancy scroll frame (here is a LINK to that post). I was expecting to use the frame for a vertical 4 x 6 inch photo, so I designed it in a vertical orientation on my 12 x 12 mat. Even though I normally cut on my Expression, I usually try to make designs that can be used by Personal (baby bug) and Create owners with the 12 x 6 mat limitation.
I must have been in a hurry that day, because I never even stopped to think that I had limited the usefulness of the file by placing the elements as I did. Tonight I was helping a friend with some design ideas and realized after I sent the files that she has the baby bug. I redid the files for her and then I thought it might be helpful to explain how to do this. I might do a video later, but right now I will explain it with words and screen shots.
Whenever possible, I make my designs "adjustable" by using the nudge arrows and building them entirely within one selection box (this can be extremely time consuming if there are many pieces involved). Unfortunately, if you need to rotate, stretch, skew or otherwise change any individual part of the design, you can't make it adjustable. If and when we ever get a true "group" function in Design Studio, I will suddenly have a lot more time on my hands! I have heard that the Gypsy will have the ability to "group" and I can't wait to see it!
So let's get started...

Here is a screen shot of the original design. There are five pieces - the large frame and four scrolls to decorate it. Since the scrolls are rotated and flipped I was not able to keep them all in the same box.
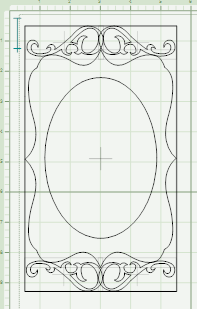
The first step is to create a guideline rectangle around the design. This will help in placing the elements on the 12 x 6 mat.
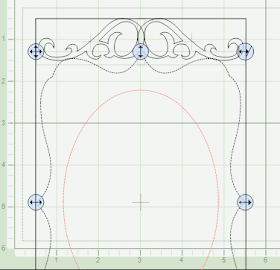
Make the rectangle in the size that just touches the frame at the widest and tallest points. Align the rectangle at the top left and then use the single direction stretch handles - right center and bottom center - to stretch the rectangle in each direction until it fits perfectly).

Copy and paste the rectangle onto a new page in the file (a new tab), rotate it 90 degrees and center it on the mat (use the tiny light gray "plus" sign in the center of the design to align it with the mat center).
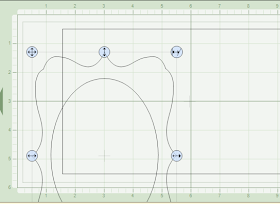
Next, select the large frame and copy it on the original page and paste it to the new page.
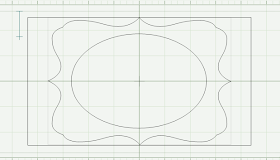
After you have pasted the frame on the new mat, rotate it 90 degrees and center it within the rectangle (once again using the tiny gray "plus" sign that indicates the center of the design.

Then copy and paste the top two scrolls to the new page. They will appear in the exact position where they were on the original design (whenever you copy and paste the item is placed in exactly the same position which is very handy in some design situations).

You can't just copy and paste the bottom two scrolls - they are too low to appear on the 12 x 6 mat. So you can copy and paste them on the original page and then move them up into the 12 x 6 mat area on that page.
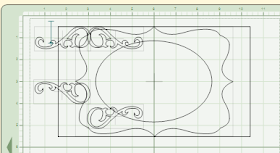
Then you can copy and paste them onto the new mat page. Remember to delete the "extra scrolls from the original page. You now have all of the elements from the original design available in the 12 x 6 working area.
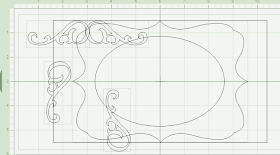
Select each of the scrolls in turn and rotate them 90 degrees - they will now look like this.

Move the scrolls to the right side of the large frame and align the outer edges with the guide rectangle.
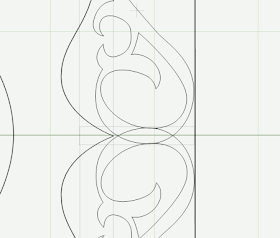
Now you can fine tune the placement and get the scrolls into perfect position - use 200 view as I did here to make it easier to see. Remember, if the "handles" get in your way you can make them disappear by holding down the "alt" key on your computer keyboard. You can also use the arrow keys (instead of the handles) to move the items around on the mat - hold down the "control" key to make the movements smaller.
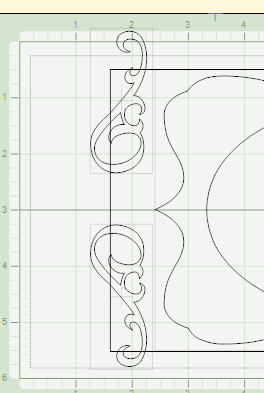
Repeat the process with the other two scrolls - first rotating them 90 degrees and then moving them into position.
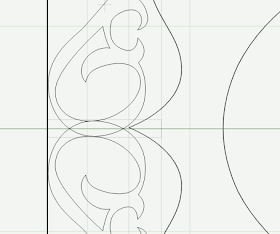
Once again, go to 200 view to perfect the placement of the scrolls.

You now have recreated the frame horizontally so it can be cut with the baby bug. You can delete your guideline rectangle at this point.
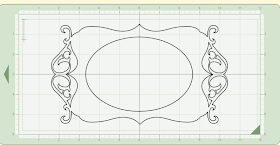
Go ahead and preview the new design - it will be the same as the original but turned 90 degrees. Now you can cut this on the 12 x 6 mat. You can do this with any design that will fit within the 12 x 6 mat - some designs maybe more complicated with more elements or different angles but it can be done!
I won't post the revised file right now - why not give this a try if you need the file for the smaller mat. Of course, if you run into problems, let me know and I will help you sort it out.

Thanks Diane, I think I may finally get the idea of adjustable files. I will try this and let you know if I need help! Thanks again!
ReplyDeleteHugs,
Vicki
I am not sure if this is the correct place to put this - I hope you get it! I am not very computer savvy so I am not sure exactly how to talk to you through this site. Anyway, I have had a baby bug for several years and bought the design studio a year ago - I rarely used it because I could not figure it out. I stumbled across your blog on the cricut website and went to it. I have read some of your basic instructions like welding and they are VERY easy to understand, and your designs are AWESOME!!!! I have spent all lot of time in the last few weeks reading your blog and getting ideas from you and saving some of your files. I just wanted to say THANK YOU for all of the help and GORGEOUS designs!! You have made me love my design studio and all of the possibilities now. You are so creative and love it when I get a new post from you. Thank you again!!!
ReplyDeleteMeredith Spalding
I have the Expression, I don't have DS YET! After viewing your blog I really want the DS, I didn't realize ALL that you could do and you have tutorials for DS for us "newbies". How great is that!! I'm hoping Santa will bring me the DS w/jukebox. THANKS
ReplyDeleteHi Vicki,
ReplyDeleteThis actually is not an "adjustable" design - if I had been able to keep all elements in one box it would have been a simple matter to rotate the frame to fit on the 12 x 6 mat and/or to resize it as a unit.
I will do another post about adjustable designs soon - there are some older ones but it may be time to show it again.
Hi Meredith,
ReplyDeleteThanks so much for your sweet comment! It makes me happy to hear that what I am doing is actually helping people enjoy using their Cricuts more.
I'd love to see any projects you have made using my files or any designs that you have been able to create on your own now that you have a better understanding of the software.
Your note was a real day brightener - thanks again!
This is a splendid idea to teach us the How To Do It with very easy understanding & terrific instructions. I just love this frame and will be using it on my project that I'm doing now!!! Thank you so much Diane as always you are the BEST!
ReplyDeleteThinking about a video as well? Another great idea and looking forward to it another time in the future.
Your help is much appreciated!
Big Hugs,
Sher