In the demonstration videos I have seen for a product called "The Ultimate Crafter's Companion," there is an interesting card which is formed by inserting a gate fold card with a reverse center fold inside a regular card (hard to say it in words but easy to understand if you look at the photos!).
To cut a shape opening in the insert, the demonstrator uses the board to score a shape and then hand trims around the score line. I have tried this tool and I found it a bit difficult to get the score lines for the shape in the correct place - when I tried the butterfly - I ended up with two sizes combined in one!
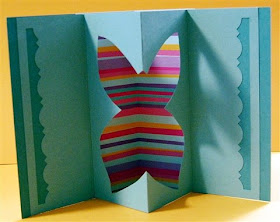
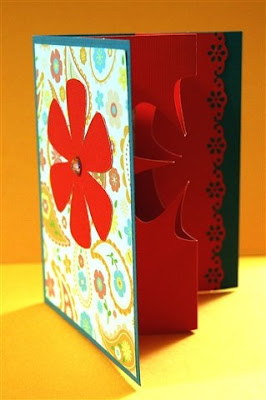
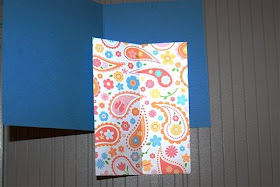
I went ahead and assembled the card with the oddly shaped butterfly and added a few personal touches. I put some lining paper behind the opening, punched the sides of the insert with a border punch and set the insert back into the card a bit from the edges to show off the borders. You can see the unembellished card center in the photo above.
I was thinking about the difficulty with scoring & hand cutting and also about the limited number of designs available on the tool. It occurred to me that with the Cricut and my Scor-Pal I could easily make interesting cards with many shapes to choose from for the center cut-out.
You need to choose a simple shape that works as a silhouette since there will be no interior details to define the shape. To cut the shape in the proper position for an A2 card, you can set up your mat in Design Studio with a rectangle that is 5.5 inches tall and 8.5 inches wide. Then add additional rectangles to help you center your image, one at 2.125 inches wide, one at 4.25 inches wide and one at 6.375 inches all aligned at the left side as you can see in the screen shot below.
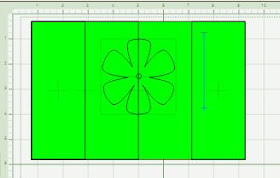
By using these guidelines, you can choose the appropriate size and placement for the shape you will cut for the pop up. In this simple example, I chose a flower from Plantin Schoolbook. Delete all but the largest rectangle when you are ready to cut the insert.

After cutting the insert, you can use the special score lines for a gatefold of an A2 card that are found on the Scor-Pal - they are marked by a small dot just beyond the 2 inch and before the 6 1/2 inch lines. If you don't have a Scor-Pal, you need to score at 2.125 inches (2 1/8), 4.25 inches (4 1/4) and 6.375 inches (6 3/8).
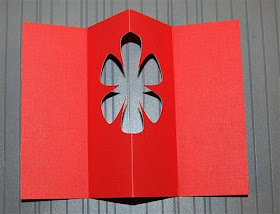
You score the 2 1/8 and 6 3/8 lines on the back of the paper (just flip it over) and the center line on the front - remember, you should fold toward the "mountain" not the "valley" so you just have to think for a minute to get the folds right. (Don't worry, if you fold it in the wrong direction you can refold it so the end result looks like the photo above!).
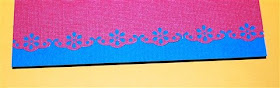
To add some interest, I used a border punch on the outside edges of the insert - in this case a flower border that is similar to the center cut-out.
I also cut a 2 x 5 1/2 inch piece of patterned paper to adhere to the center of the card (folded right sides together and then adhered it in the folded card.
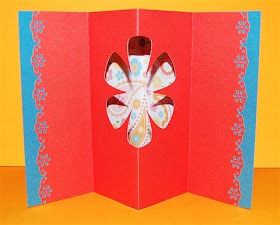
Then I adhered the insert to the card, setting it back a bit from the edges to show off the pretty punched border. I used the edge of the patterned paper liner as a guideline for adhering first one side and then the other side of the insert.
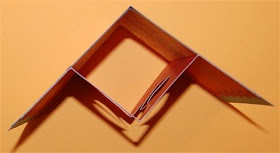
Above is a view from the top of the card to show the construction more clearly.

Here is one more photo so you can see how it all fits together.
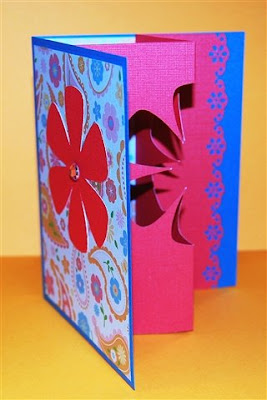
When the card is closed the insert collapses along the fold line.
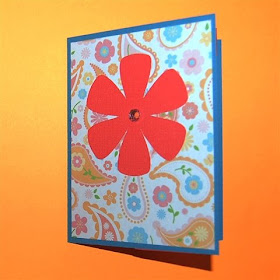
I cut a piece of the same patterned paper for the front - cut at 4 x 5 1/4 inches and centered. I used the cut out flower from the insert as a decoration on the front of the card with a gem for the center of the flower. The card is now ready for a sentiment and some additional embellishing. If you want to ink the edges or stamp or use Stickles on the insert it will be easier to add these to the flat insert before you assemble the card.
There is no file to share today - just follow the directions above and you can make a card with a pop up insert and a cut-out in any shape you would like!


