
I keep getting questions from readers on how to weld the snowflakes inside circles and make them adjustable. Today, I finally had a chance to do a step by step picture tutorial for all of you visual learners!
In this example, I used the silhouetted circle from Mini Monograms and a snowflake from Joys of the Season. Earlier this week I posted a list of carts that have some sort of silhouetted circle - here is a LINK to that post. You can put any element inside the circle by following these steps but since everyone liked the snowflakes I used one again for this lesson.
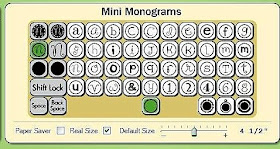
You can see the highlighted keys above showing how to select the silhouetted circle on Mini Monograms. Since this circle is intended to be used as a layer for the shapes on the lower right corner of the keypad I recommend checking "real dial size" which will make the circle the actual size you select on the slider bar. Since you are only using two elements you can choose a large size which makes it easier to see the details as you work.

Above you see the 4 1/2 inch circle on the mat - notice the "handles" and the light gray line connecting them - this is your "selection box."
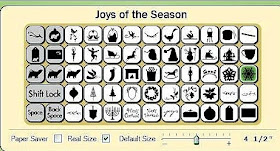
Above you can see the keypad showing the snowflake I selected from the Joys of the Season cartridge. You could use many of the other designs as well - I did the menorah, Star of David and dreidel for a friend.

You can start off by clicking somewhere on the mat to deselect the circle and then choosing the snowflake at the same size. You can probably tell at a glance that this is too large to fit in the circle.
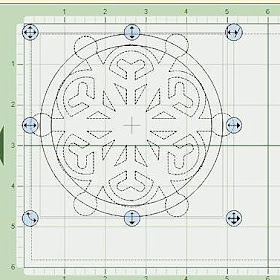
Using the handle on the center left you can slide the snowflake over to the side to place it on top of the circle - it is clearly too large to fit (but I think this also would be a pretty design to cut!).

Making a guess, you can try a smaller size - here I "auditioned" a 3 1/2 inch snowflake. Preview this design, making sure that the weld box in the Shape properties box is checked for both the circle and the snowflake.
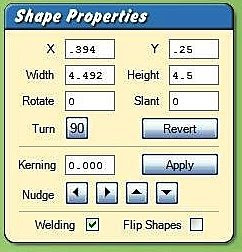
If you look carefully at the image below, you can see that the dark lines which indicate the cutting lines show that there is not enough overlap of the shapes for a weld to work using this size for the snowflake.

So, try the next size up on the slider bar - 3 5/8 inches. It is important to use the slider bar to set the size because you will not be able to adjust the snowflake you want to weld by the handles since it will be in a combined design box.

Above you can see that the test preview of the 3 5/8 inch snowflake shows that there will be a good weld - the six points all overlap into the circle enough to connect the elements.

Now that you know what size snowflake you need, you are ready to make the design. Leave the trial snowflake in place and click anywhere on the circle to select it.
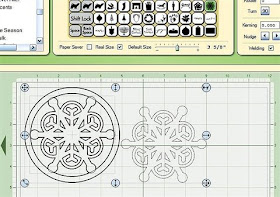
Then, make sure that the slider bar is set at 3 5/8 and add the snowflake. You will have one large box surrounding these two elements as you can see above. Double check to be sure you have the "weld" function checked (you should still have it on from previewing the circle and snowflake welded as independent elements).

Now, use the "nudge" arrows (shown above) to move the snowflake into position.

Click on the left nudge arrow repeatedly to move the snowflake over to the left. You can hold down the arrow key and make the snowflake move continuously but there is a tendency for the arrow to "stick" which means that the snowflake will become unstoppable! If this happens, click somewhere else on the mat, save your file and then close the Design Studio program. You will need to wait for it to reload, but then you can reopen the file and pick up where you left off.

Once you have nudged the snowflake into position horizontally it will look like this - now you just need to use the "up" arrow to place the snowflake into the final position.

By leaving the "trial" snowflake in position, you have a guide for the final placement - above you can see the snowflake completely nudged into position (it has almost disappeared on top of the trial snowflake).

Using the handle at the center left of the selection box, you can slide the circled snowflake to the right. The circle and snowflake will move as one unit, leaving the trial snowflake where it was placed on the mat earlier.

Above you can see the completed design after hitting the preview key - you can tell by the dark lines that the shape will cut correctly.
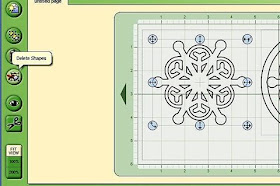
Now, you can delete the trial snowflake from the mat.

Next, while the new design is selected, click the copy button in the left column,
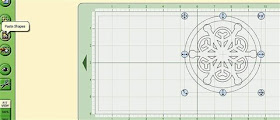
and then click the paste button.

A second snowflake will be pasted directly on top of the design. You can see that the lines are a bit darker, showing you that there are now multiple snowflake designs.

Using the left center handle, slide the newly copied and pasted design to the left

Then using the handle in the lower right corner you can resize this design.

Copy and paste as many times as you like and change the sizes to whatever you want - you can now make your own blizzard of matching snowflake designs in various sizes.
Let me know if this explanation helps you make this type of design using the cartridges that you own. Once you have mastered this simple design, you can apply the same principles to make adjustable designs containing many elements. Have fun and let me see what you are making!

Thanks for the great tutorial!! This is soo cool :)
ReplyDeleteThank you so much for this tutorial. I haven't worked with ds very much - now that the snow is flying I will hope to be spending more time. The manual gives you basics but doesn't help much - so I do appreciate your taking the time to explain and demonstrate. This will be helpful. I saw a swivel card the other day and would like to make several for christmas. Instead of using an exacto knife to cut all the designs I was thinking ds would come in handy. Have you seen one done? I will attempt! Thanks again!
ReplyDeleteRosy
Again, super generous of you to do this!!
ReplyDeleteI do have a question, and it maybe obvious, but once we have the sample snowflake in the circle and have welded it to make sure it's the correct size, why create a new one? I thought we were welding the first time around.
What am I missing?
Happy Thanksgiving,
LA
Hi Leslie,
ReplyDeleteI answered you by email but just in case anyone is reading these comments and has the same question I will answer here too.
Very simply - you do not have to do the rest of the steps if you just want one snowflake welded in a circle at a certain size.
The rest of the steps are needed to create an "adjustable" file where the entire design can be moved as one unit and stretched, copied, pasted rotated, etc. as a single design.
thank you for showing me how to make the design bigger or smaller
ReplyDeletejoanneh
Thank you soooo much for the step by step! Boy, posting it was a real project but it is sooo much appreciated. I'm gonna go try this immediately! Major hugs! Donna
ReplyDeleteThanks so very much for the tutorial.
ReplyDeleteNow making an object that is
resizable makes so much more sense. You are awesome.
Angie Person
Love your blog. Thank you for sharing.
ReplyDeleteDiane....thanks for this tutorial. I have been trying to figure out HOW you changed the size of the second or third element -- I had NO CLUE that you could use the slider bar to change the size...this opens up so many possibilities, as I thought I was stuck with both elements having to be the same size. Great explanation -- LOVE IT! I so appreciate the time you put into helping us "learners" out!
ReplyDeleteThanks for this tutorial, now I see where I have been going wrong! Thanks also for all the downloads.
ReplyDeleteeileenpaul
I love all of your snowflake designs. You always come with great cuts! Thanks for sharing!
ReplyDeleteI love your Tutorials! I have learned so much from you... THANK YOU!
ReplyDeleteDiane, thanks for this very easily understood tutorial. I will have to give it a try tonight! Awesome work! Thanks again!
ReplyDeleteCindyS from Cricut MB
I really enjoy your blog. I always seem to pick up helpful information and tips when reading your tutorials. I truly appreciate all the time and effort you put into doing this to help everyone. Your work is awesome! Thank you so much for sharing your talents!
ReplyDeletelinda4_2
I always saw that you did your grouping images, and it wasn't until I saw this tutorial that I finally figured out HOW you did it.. thanks for sharing the technique! I know you've done it before but it's the first time I figured out HOW you did it.
ReplyDeleteLove the snowflakes btw!
Saw your name mentioned as someone to assist with DS. Thank you so much for the awesome instructions in this tutorial. I am so psyched to learn this!
ReplyDeleteNow that I have mastered this, let me retry what I was trying to do and see if I can get it to work (I was trying to weld 3 images in a rectangle) The rectangle just cut with the points of the images and all i have is a weird rectangle with bites. :-(
thanks!
Thank you for the tutorial. You explain the process very well and I can't wait to experiment.
ReplyDeleteDiane,
ReplyDeleteI knew I would find your tutorial, if I looked hard enough! I had forgotten the part about using the slider bar to resize the second item. I'll have to try this again! I should audio tape your classes, so I remember everything!
Thanx for your help!