
I realized this morning that with the new update to the design studio software we have new options for creating our designs and some can be created in "groups" that can be copied and resized easily.
I made this tutorial to explain this in more detail - I am trying to be complete in my directions but I have not yet had enough time to experiment with all the possibilities and to discover all of the potential flaws. I did spend most of the afternoon trying to get this tutorial prepared so you can enjoy the increased flexibility we have with the newest update of the software. Please add comments and contact me with your problems or solutions as we figure this out - I am very excited by the projects that will be possible now but still have a few "wish list" items.
I am putting this up before I test cut the design I am showing and, as always, will not post the file until I have tested it - so check back later if you would like it. I did test cut the Sugar & Spice and Camp Fun designs that I posted in screen shots last night and will get them up soon - I woke up with the idea about grouping and it has consumed me all day!
So let's get started.
To begin, open a new project and choose the cartridge you would like to use to start your design. With school starting around the country, I chose the phrase "School Days' for use with all of those first days of school photos.
Type the phrase on the mat either by clicking on the virtual keypad or typing on your computer keyboard (be aware that you can't use "shift" on your keyboard).
I used Plantin Schoolbook (for obvious reasons!)
The word will look like this
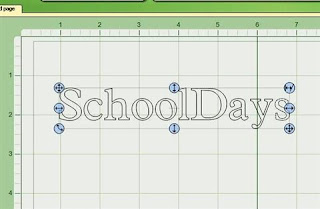
You will use the "nudge" arrows in the control panel to manipulate these letters. The big improvement with this version of the software is the addition of the up and down arrows for vertical nudging (we have been able to do horizontal nudging since the program was released). Be sure to check the "weld" box.

The first letter or object in any grouping is not "nudgeable" - you move it by using the blue handle in the upper left corner of the light gray outline that surrounds the word (the selection box). Click on the second letter "c" to make it "active" - it is "active" when the outline turns to a dotted line as you can see below

You could just start nudging from the original positions of the letters after entering the letters, but, to make the process quicker, it is easier to using the "Kerning" feature. I usually try -.01 as a value and see how that works out - here is the box where I have entered that value.
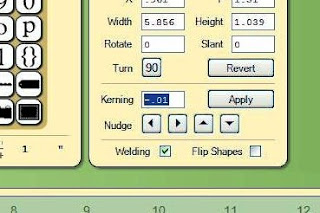
Once you click the "apply" button next to the kerning box the letters will look like this
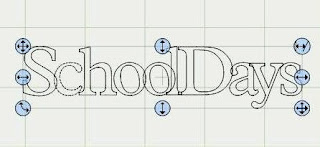
This brings them closer together for you to start "nudging' them around. With the new buttons you can vary the positions up and down and get a more graceful looking weld (some letters don't weld well next to each other and can become difficult to read).
I decided to move the "c" up a bit like this

I continued to use the "nudge" arrows to get the other letters in a pleasing arrangement and then I previewed the welds by click on the "eyeball" in the left column next to the mat - this is how it looked at this point

Now it is time to work on the second word,"Days," which I wanted to place below the word "School." With the previous version of the software, I would need to start another group in a new box but by using the up and down keys, you can keep all of the elements together.
I started by selecting the "D" and nudging it to the left. You can hold down the nudge key instead of repeatedly clicking, but be careful with this. I am not sure if it is the software or my computer, but twice I had the problem of the nudge key "sticking" and I lost control of the design and had to start over!
Here is the "D" nudged into position

As you can see, the other letters "followed" the "D" to the left - they don't seem to follow up and down - just left and right (but I am still figuring things out!). After more nudging the letters are all in position and I checked the welds again

With this method you can create word images similar to the ones on the new Graphically Speaking cartridge, but I have not yet found a way to alter the angle of the letters within the group (and I am not sure if there is one...yet).
Now I was ready to have a bit more fun - so I went to the Stretch Your Imagination cartridge for the schoolbus image (yes - you can mix cartridges and image sizes - that one of the exciting aspects of this program!).
I guessed on the size - two inches was too big so I used the "backspace" key on the keypad to remove it and tried a few other sizes - eventually settling on the one inch bus. As far as I can tell, sizes on images are determined by the height of the item but if you guess wrong and want to change the image use the "backspace" key NOT the delete button on the left which will delete the entire group!

Here you can see the bus when it was first added
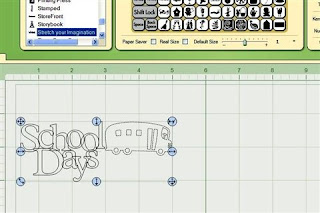
and this is how it looks after nudging it down and over a bit and previewing the welds

So far, so good. I decided to add some sort of frame around this image (another improvement - in the earlier version welds inside frames would not work properly and you had to "build" a frame from other elements to get an image welded in a frame). I went to Fabulous Finds and found a label holder (not sure if that is the technical name!) and decided to try it - I thought it might look cute on a cover page for a school album.
Once again, remember to keep the original design selected as you try various additional items and remove them ONLY by using the backspace key on the virtual keypad.
Here is how the mat looked after I selected the frame - at this point you want to be sure that your original design is over to the left side of your mat to allow room to add the frame - if you are having trouble getting it to add in the same box you should change your mat size to 12 x 24 on the pull down view menu to give yourself a bigger working area.

I moved the frame over and to the left and then discovered that it was a bit too large
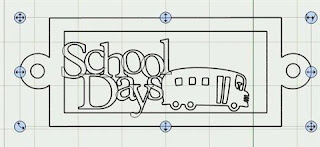
So I backspaced and changed the size on the slider bar and added a new frame to the mat - this one was more appropriate and, interestingly, it appeared in a position similar to where I had nudged the one I removed and not far off to the right side as the first one did
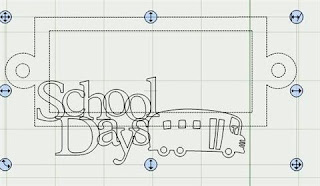
With some more nudging I got it into position and checked the welds

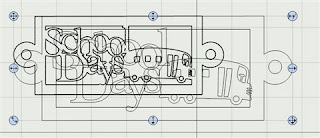
I now have a completed design - all in one selection box! This means I can use the handles to manipulate everything at once - below you can see the preview preserved on the screen while I pulled the handle to enlarge the design (by the way - if you want to quickly remove the preview use "control L")
I can also copy and paste the design and slide the new one into a different position as you see below
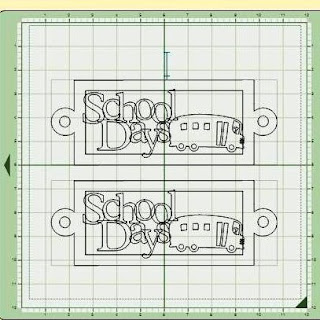
and even resize and rotate this new image!

I hope that this information will help you to create lots of fabulous designs. Please contact me by emailing or commenting if you have any questions. I will continue to work on figuring out ways to use these new features (and I will get those files posted soon!).
This is not the ultimate solution - what I really hope for is the ability to "select all" and "group" the elements - but, all things considered, it is a great improvement!

Thanks for the great tutorial!
ReplyDeleteDiane,
ReplyDeleteyou are a genius.
Dianne,
ReplyDeleteAbsolutely brilliant! I'm stunned that PC didn't make a big announcement on this!!!
Hollygtn
blog.scrapallier.com
You are amazing!!TFS and for teaching us so many things!!!
ReplyDeleteWow you are so good with CDS! We appreciate you sharing with us...you have become our CDS tutor as Provo Craft doesnt even provide any documentation with their updates! Without you we would be lost and to be brutally frank I am not sure it would have been worth the investment for me! Your tuts give us the inspiration and knowledge we need to use the product. Thanks again for being so generous.
ReplyDeletegardengirl
I was curious...I tried to add an additional item to my word group and it always make it separate (not apart of the words). What am I doing wrong? thanks for your help and sharing.
ReplyDeleteSheila
thank you so much ,your blog is so helpful , and i get all your cut files . i just love them .
ReplyDeleteAnn W
weedmana@embarqmail.com
Dianne,
ReplyDeleteTHANK YOU, THANK YOU, THANK YOU! I didnt understand the first time but with this post I totally get it now. Thanks for taking the time to show all of use how to group.
Thank you so much Diane. What a great discovery and such a good tutorial.
ReplyDeleteBrenda in Texas
Wow love your blog, and thanks so much for the instructions for welding! I am a newbie to CDS and was finding it hard to figure out. I still need lots of practice, but it's fun trying.
ReplyDeleteAlso thanks for the instructions on the layering of princesses, dd wants to make one and I was feeling intimidated by it. Will have to make time to cut one out for her.
HUGS!!
Diane,
ReplyDeleteAs always, you are totally awesome. I just had time tonight to install the latest update and haven't had time to really play yet. Thanks for figuring all of this out for us. You make it so easy!!!!
DivaInPink
Thank you thank you thank you. You make it so easy to learn. I actually made this work!
ReplyDeleteSo very useful! Thanks for doing this thorough tutorial, Diane! :)
ReplyDeleteCUTE!
ReplyDeleteThank you, you rule!
ReplyDeleteThank you so much! I just found your blog and tried this and it worked!!!! So very exciting!
ReplyDeleteWow Diane! Thanks so much for your tutorial. I haven't updated yet but now I will. Thanks for all you do. BTW, thanks also for the beautiful photos of Hill Cumorah. I will definetly be downloading those from your site. You are awesome! Kimberly in So.CA.
ReplyDeleteI want to say thank you for creating this wonderful screen by screen tutorial. My nudge just kept moving just like you said. Too funny. I am getting ready to do the process again. LOL Thanks again your designs are great and the more carts I buy the more of your creations I can cut out. You do fantastic work.
ReplyDeleteYou are my new hero!!!
ReplyDeleteThanks for all your time and effort! I would have never figured this out on my own!!
ReplyDeleteWow! Your tutorial is wonderful! I just tried it and I can see how this is going to make things a lot easier - and think of the possibilities!! Thanks for all your hard work,wonderful designs, and inspiration!!
ReplyDeleteThank you so much Diane!!! Your blog is so very helpful and informative. I really appreciate this tutorial AND all the .cut files you continually share. Thanks again!
ReplyDeleteThank you, Thank you, Thank you!!! This is what I have been waiting for!
ReplyDeleteDiane, you are awesome! Thanks so much for the great tutorial and for sharing this breakthrough info with us. Never would have figured this out on my own, can't wait to give it try on my next cut file. Guess this is the closest we'll get to a select all function...
ReplyDeleteThank you, Diane!!!
WOW! You are brilliant to figure this out. TY TY TY! You are worth your weight in GOLD for sharing this with your MB friends!
ReplyDeleteHave a blessed day!
Clara
Wow!! I'm still learning the program (I suppose we all are, but I'm at the beginning stage!) and know that this tutorial has provided invaluable information. Thank you SO much for taking the time to write it all out so the rest of us can learn from it!!
ReplyDeleteDiane, thank you for all your creative talent that you share with all of us. I can understand you would like to be recognize for all your gorgeous work and time. So I am giving you my great big Thank You!!! THANK YOU DIANE!!!
ReplyDelete"Um Buggin"
Wow - I wasn't going to upgrade... have had no problems thus far so didn't want to tempt fate. But now I HAVE TO! I am soooo impressed by your creativity, and the way you explain things - thank you so much!! Great Job!
ReplyDeleteThank you so much for all your hard work. It is much appreciated.
ReplyDeleteThanks for your help! I am a newbie with DS and with NO instructions from PC Cricut Design Studio I think your tutorial will help me do what I want to do! Cricut should really have you do a manual for THEIR DS!!!
ReplyDeleteThanks Diane - as always you are AWESOME!
ReplyDeleteThank you so much for this great information and taking the time to share it with everyone!!
ReplyDeleteLinda4_2
Oh, wow! I knew you could "group" items by adding them in the same selection box, but would have never thought it would make this type of design possible! I was only using the feature to make single words as a "group". Thanks for tutorial!
ReplyDeleteThanks for the great lesson, made it easy to understand. Thanks a million!!!
ReplyDeleteThank You so much for putting the time into sharing what you have learned with all of us! I think its just amazing how generous everyone is with the knowledge they gain about this program!
ReplyDeletetHANK YOU SO VERY MUCH FOR YOUR TUTORIALS WITH THE DESIGN STUDIO. I LOVE LEARNING THE NEW THINGS I CAN ATTEMPT TO DO WITH MY CRICUT! YOUR TUTORIALS MAKE MY LEARNING EASY!!
ReplyDeleteI bought my program in September, & assumed I was updated when I hooked it up. I couldn't figure out how someone came up with those awesome adjustable designs so thanks a ton.(I don't have the nudge up & down buttons) It's incredible how all this info has made such a world of difference, since when I first bought it, I was so lost and very much regretting putting out $60! Now, I am continually amazed by the endless possibilities and by the people like yourself who take the time to share your knowledge. You're super ~ thanks again. (My hope is to get to the point where I can return the favors thru sharing myself)
ReplyDeleteWow!!! That is totally awesome that you figured this out! Thank you so very much for sharing this and giving us this great tutorial!
ReplyDeleteThis is good stuff. Thanks for a great tutorial.
ReplyDeleteKaren Hilaire
Thanks so much for this! I'm in awe of this new feature. Came over from the CMB and can't wait to try this out. Cristal
ReplyDeleteThank you for these instructions. I didn't know you could vary the sizes. You learn something new every day! I'm sure this tutorial will be of great help to many.
ReplyDeleteCyn
Thanks for that awesome tutorial!!
ReplyDeleteThanks for this. You made things a lot clearer:)
ReplyDeleteDiane, You are awesome!! I got my Expression in November and Ds and am continuing to learn how to use this awesome machine. It seems I do not understand about the sizes. If I put a size on the slider it changes each time I add an element. I don't really understand the size box at the top. I also have trouble cutting thicker paper such as Bazzille and chipboard. I have read that some people us a different blade -60 Roland, do you just use the standard blade? Lots of questions. Maybe you could address some of them on your lessons. Keep up the good work. Thanks for you help.
ReplyDeleteI have tried to accomplish what your tutorial demonstrates...without success UNTIL I found your 'how to'!!! It was so logical...a 'duh' moment for me!!! Thanks again...really appreciate your efforts!
ReplyDeleteDREAT TUTORIAL!!! TYFS
ReplyDeleteI feel really dumb now!!!! I use the DS Every day and have used the up and down nudge, but it NEVER occured to me to move it down that far and add more to it! I am patiently waiting for a group all feature, but this will make some of my projects alot easier! Thanks! Now I'm off to see what else you have to teach me!
ReplyDeleteThank you for your tutorial. I'm still having trouble with this. I can get DS to add additional letters in the box but I can't "bump" it down to the next line. Which up and down arrows are you talking about? If I use nudge buttons, it only nudges one letter at a time. Is that how it is supposed to be? Sorry for all of the ?'s. Just wanna figure this out. Thanks! :O)
ReplyDeleteCathy,
ReplyDeleteThe nudge arrows are highlighted in the blog entry - they are in the "Shape Properties" box in the top right of your screen.
Do you have the latest version of the software? If you installed from a CD you would have to go to the Cricut.com site to get the most recent update.
When you open the program it should say "Version 1.0.21104.0"
If you need more help, please send an email to me at capadiadesigns@gmail.com
Thank you Diane. I was working on something and remembered you had created this tutorial. It helped a lot, saved me probably several hours of figuring out how I wanted a simple shape.
ReplyDeletek
thanks for your great tutorials...My circut would be just sitting on the bench... I would hve never done it without you...Hope to see more...
ReplyDeletethanks again Delia
Thank You so much. I was so looking for that "grouping" thing with the different sizes within. You done a great job explaining this, to bad I didn't know this sooner. Thanks Again for sharing your insight.
ReplyDeletePina
Thank you So very much for your Tutorial, I love creating in DS and this just opened up So many more opportunitys to help give myself and others so many more Great designs, Thanks again.
ReplyDeleteHugs and God Bless
Dana
Awesome tutorial - Thank you so much! My daughter is a cheerleader and this will really come in handy for making locker decorations, etc over the years since we will need the same Go Boro in many different sizes!
ReplyDeleteDiane, I love this...I have never thought of creating a "group" in this way. Wonderful job!!!!
ReplyDelete~Molly
This is exactly what I've been looking for. So frustrating when you create a design and then can't resize it. You are awesome!
ReplyDeleteJean
Thanks sooo much I have been figuring out the Design Studio on my own and figured I was doing a great job at it...until now I realize that I needed an expert and have now found on!!!
ReplyDeleteThanks,
Denise in WA
www.rndhud6.blogspot.com